Breakfast Meal Prep Ideas for the Week (10 Easy Recipes That Last)
Quick Answer
This guide covers breakfast meal prep ideas that last several days, save time on busy mornings, and stay practical for real weekday routines.
Practical note
For Breakfast Meal Prep Ideas for the Week (10 Easy Recipes That Last), the home-kitchen check is not only the number of days. We look at the start date, fridge temperature, container seal, serving time, and spoilage signs. If one of those facts is missing, the safer move is to use the shorter window.
Decision table
| Situation | Likely cause or meaning | Best move |
|---|---|---|
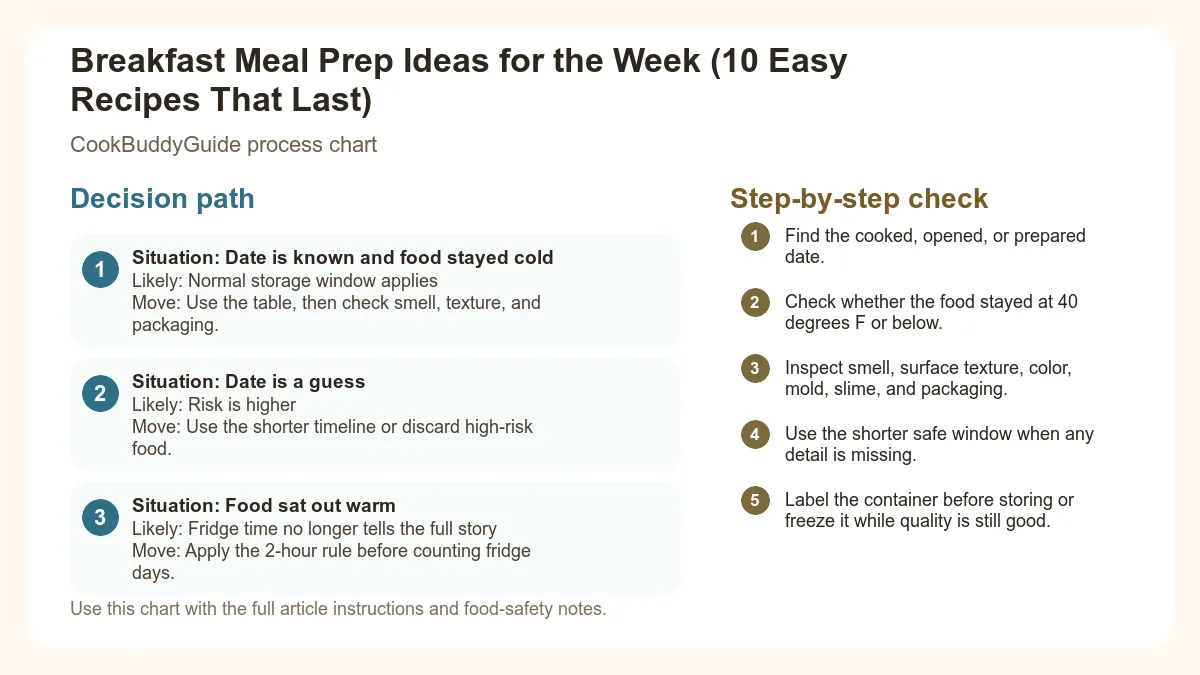
| Date is known and food stayed cold | Normal storage window applies | Use the table, then check smell, texture, and packaging. |
| Date is a guess | Risk is higher | Use the shorter timeline or discard high-risk food. |
| Food sat out warm | Fridge time no longer tells the full story | Apply the 2-hour rule before counting fridge days. |
Step-by-step fix
- Find the cooked, opened, or prepared date.
- Check whether the food stayed at 40 degrees F or below.
- Inspect smell, surface texture, color, mold, slime, and packaging.
- Use the shorter safe window when any detail is missing.
- Label the container before storing or freeze it while quality is still good.
Common mistakes
- Counting fridge days from the day you noticed the container instead of the day it was made.
- Ignoring time spent on the counter, in a lunch bag, or on a serving table.
- Trusting smell alone when the date or temperature history is unknown.
- Putting warm food into a deep container that cools slowly.
Related topic hubs
Introduction
You're rushing out the door on a Monday morning, already running late, and realize you haven't eaten breakfast. Again. You grab a granola bar and promise yourself you'll do better tomorrow. Sound familiar?
Quick Navigation
- Why Breakfast Meal Prep Matters
- Recipe 1: Egg Muffin Cups
- Recipe 2: Overnight Oats Jars
- Recipe 3: Make-Ahead Breakfast Burritos
- Recipe 4: Greek Yogurt Parfait Jars
- Recipe 5: Banana Bread Muffins
- Recipe 6: Breakfast Quinoa Bowls
- Recipe 7: Sheet Pan Eggs with Vegetables
- Recipe 8: Chia Seed Pudding Cups
- Recipe 9: Freezer-Friendly Pancakes
- Recipe 10: Energy Bite Snack Boxes
- Practical Meal Prep Tips
- Common Mistakes to Avoid
- FAQ
Why Breakfast Meal Prep Matters
Skipping breakfast isn't just about feeling hungry—it affects your entire day. According to research from the USDA, people who eat breakfast tend to have better concentration, more stable blood sugar levels, and improved nutritional intake throughout the day.
Recipe 1: Egg Muffin Cups
Ingredients You'll Need
- 12 large eggs
- 1/4 cup milk (dairy or unsweetened almond milk)
- 1 cup shredded cheese (cheddar, mozzarella, or Mexican blend)
- 1 1/2 cups diced vegetables (bell peppers, spinach, mushrooms, onions)
- 1/2 cup cooked protein (turkey sausage, chicken, or black beans for vegetarian)
- 1/2 teaspoon salt
- 1/4 teaspoon black pepper
- 1/4 teaspoon garlic powder
- Cooking spray
Substitution options: Use any vegetables you like, but avoid watery vegetables like tomatoes or zucchini unless you pre-cook them. For a dairy-free version, skip the cheese and milk, or use non-dairy alternatives.
Step-by-Step Instructions
- Whisk together eggs, milk, salt, pepper, and garlic powder in a large bowl until well combined and slightly frothy, about 30 seconds.
- Divide your vegetables and protein evenly among the muffin cups, filling each about halfway. Use about 2 tablespoons of filling per cup.
- Pour the egg mixture over the fillings, leaving about 1/4 inch space at the top. The eggs will puff up during baking. Fill each cup about 3/4 full.
- Sprinkle cheese on top of each muffin cup, using about 1 tablespoon per cup.
- Let cool in the pan for 5 minutes, then run a butter knife around each muffin to release. Cool completely before storing.
⏱ Time Required: 10 minutes prep, 25 minutes cooking, 5 minutes cooling
Storage Instructions
Store in an airtight container in the refrigerator for 5-7 days. I stack them with parchment paper between layers to prevent sticking. Reheat in the microwave for 30-45 seconds until warmed through.
For longer storage, freeze individually wrapped in plastic wrap, then place in a freezer bag for up to 3 months. Reheat from frozen for 1-2 minutes in the microwave.
Recipe 2: Overnight Oats Jars
Ingredients You'll Need (Per Jar)
- 1/2 cup rolled oats (not instant or steel-cut)
- 1/2 cup milk of choice
- 1/4 cup Greek yogurt
- 1 tablespoon chia seeds
- 1 tablespoon maple syrup or honey
- 1/4 teaspoon vanilla extract
- Pinch of salt
- Toppings: fresh fruit, nuts, nut butter (add morning of)
For 5 servings: Multiply each ingredient by 5 and prepare in individual mason jars.
Step-by-Step Instructions
- Pour in the milk, then add Greek yogurt, maple syrup, and vanilla extract to each jar.
- Stir well with a spoon, making sure to scrape the bottom where oats tend to clump. This takes about 30 seconds per jar.
- Seal with lids and refrigerate for at least 4 hours, but preferably overnight. The oats need time to absorb the liquid and soften.
- In the morning, stir and add your toppings. Add fresh berries, sliced banana, or a spoonful of almond butter.
Recipe Variations
- Chocolate Peanut Butter: Add 1 tablespoon cocoa powder and 1 tablespoon peanut butter per jar
- Apple Cinnamon: Add 1/2 teaspoon cinnamon, 1/4 cup diced apple, and a sprinkle of nutmeg
- Berry Almond: Use almond milk, add 1/4 teaspoon almond extract, top with mixed berries and sliced almonds
⏱ Time Required: 15 minutes total prep for 5 jars
Storage Instructions
These last 5-7 days in the refrigerator in sealed jars. The texture actually improves over the first 2 days as the oats continue softening. Don't add fresh fruit until the morning you eat them, or they'll get soggy. Nuts can be stored in the jar, but they'll lose their crunch after 3-4 days.
Recipe 3: Make-Ahead Breakfast Burritos
Ingredients You'll Need (Makes 12 burritos)
- 12 large flour tortillas (burrito-size, 10-inch)
- 16 large eggs
- 1/4 cup milk
- 1 pound breakfast turkey sausage or black beans (for vegetarian)
- 2 cups shredded cheese
- 2 cups diced bell peppers and onions
- 2 cups baby spinach
- 2 tablespoons olive oil
- Salt and pepper to taste
- Optional: salsa, avocado, hot sauce (add when eating)
Step-by-Step Instructions
- Cook your protein in a large skillet over medium heat until browned and cooked through, about 8-10 minutes for sausage. Remove and set aside.
- In the same skillet, add 1 tablespoon olive oil and sauté the peppers and onions until softened, about 5 minutes. Add spinach and cook until wilted, about 2 minutes. Remove and set aside.
- Whisk eggs with milk, salt, and pepper. In a clean skillet over medium-low heat, scramble the eggs until just set but still slightly wet, about 5-6 minutes. They'll continue cooking from residual heat. Don't overcook them or they'll be rubbery after reheating.
- Warm tortillas in the microwave for 20 seconds wrapped in a damp paper towel. This makes them pliable and prevents tearing.
- Fold in the sides, then roll tightly from the bottom up, tucking as you go. The key is to pull back slightly as you roll to keep it tight.
- Wrap each burrito individually in aluminum foil, writing the date on the outside with a permanent marker.
⏱ Time Required: 45 minutes total
Storage Instructions
Refrigerate for up to 5 days or freeze for up to 3 months. For refrigerated burritos, remove foil and reheat in the microwave for 1-2 minutes, flipping halfway through.
For frozen burritos, you can reheat directly from frozen. Remove foil, wrap in a paper towel, and microwave for 2-3 minutes, flipping halfway through. Let stand for 1 minute before eating—the center will be lava-hot.
Recipe 4: Greek Yogurt Parfait Jars
Ingredients You'll Need (Makes 5 parfaits)
- 2 1/2 cups plain Greek yogurt (2% or full-fat stays creamiest)
- 2 tablespoons honey
- 1 teaspoon vanilla extract
- 2 cups granola (store-bought or homemade)
- 2 cups mixed berries (blueberries, strawberries, raspberries)
- Optional: 1/4 cup sliced almonds or chopped nuts
Step-by-Step Instructions
- Mix Greek yogurt with honey and vanilla extract in a bowl until smooth and well combined.
- Prep your berries by washing and drying them thoroughly. Dice strawberries into bite-sized pieces. Wet berries will make everything soggy.
- In 16-ounce mason jars, create layers: Start with 1/4 cup yogurt mixture on the bottom.
- Add 2 tablespoons granola, then 1/4 cup berries.
- Repeat layers: another 1/4 cup yogurt, 2 tablespoons granola, and 1/4 cup berries.
- Seal jars and refrigerate for up to 5 days. Store granola separately if you want maximum crunch, adding it the morning you eat the parfait.
⏱ Time Required: 20 minutes for 5 jars
Storage Instructions
These stay fresh for 5 days in the refrigerator. The granola will soften after day 3, which some people (including me) actually prefer. If you want crunchy granola throughout the week, store it separately in small containers or bags and add it each morning.
Recipe 5: Banana Bread Muffins
Ingredients You'll Need (Makes 12 muffins)
- 3 large very ripe bananas (the browner, the better)
- 1/3 cup melted coconut oil or butter
- 1/2 cup honey or maple syrup
- 2 large eggs
- 1 teaspoon vanilla extract
- 1 teaspoon baking soda
- 1/4 teaspoon salt
- 1 teaspoon cinnamon
- 1 3/4 cups whole wheat flour (or all-purpose flour)
- Optional: 1/2 cup chocolate chips or chopped walnuts
Step-by-Step Instructions
- Preheat your oven to 350°F and line a 12-cup muffin tin with paper liners or spray generously with cooking spray.
- In a large bowl, mash the bananas with a fork until smooth with only small lumps remaining. This takes about 1-2 minutes.
- Add melted coconut oil, honey, eggs, and vanilla to the mashed bananas. Whisk until well combined, about 30 seconds.
- Sprinkle the baking soda, salt, and cinnamon over the wet mixture. Mix until incorporated.
- Fold in chocolate chips or walnuts if using.
- Divide batter evenly among muffin cups, filling each about 3/4 full. Use a 1/4 cup measuring scoop for consistent sizing.
- Bake for 20-25 minutes until a toothpick inserted in the center comes out clean or with just a few moist crumbs. The tops should be golden brown and spring back when lightly pressed.
- Cool in the pan for 5 minutes, then transfer to a wire rack to cool completely before storing.
⏱ Time Required: 15 minutes prep, 25 minutes baking
Storage Instructions
Store in an airtight container at room temperature for 3 days, or refrigerate for up to 7 days. These also freeze beautifully—wrap individually in plastic wrap and freeze for up to 3 months. Thaw overnight in the refrigerator or microwave for 20-30 seconds.
According to FDA food storage guidelines, baked goods containing eggs should be refrigerated if storing longer than 2-3 days at room temperature.
Recipe 6: Breakfast Quinoa Bowls
Ingredients You'll Need (Makes 5 servings)
- 1 cup uncooked quinoa
- 2 cups milk of choice (Use unsweetened almond milk)
- 1 teaspoon vanilla extract
- 1/4 cup maple syrup
- 1 teaspoon cinnamon
- 1/4 teaspoon nutmeg
- Pinch of salt
- Toppings: fresh fruit, nuts, seeds, coconut flakes (add when serving)
Step-by-Step Instructions
- Rinse quinoa thoroughly in a fine-mesh strainer under cold water for 30 seconds. This removes the bitter coating. Don't skip this step.
- Combine quinoa, milk, vanilla, maple syrup, cinnamon, nutmeg, and salt in a medium saucepan.
- Bring to a boil over medium-high heat, then reduce to low and simmer covered for 15-20 minutes until the liquid is absorbed and quinoa is tender. You'll see little spiral tails on the grains when they're done.
- Remove from heat and let stand covered for 5 minutes. Fluff with a fork.
- Divide into 5 storage containers. Let cool completely before sealing and refrigerating.
⏱ Time Required: 5 minutes prep, 20 minutes cooking
Storage Instructions
Store in airtight containers in the refrigerator for 5-7 days. Reheat individual portions in the microwave for 1-2 minutes, adding a splash of milk if it's too thick. The quinoa absorbs liquid as it sits, so it will thicken over time.
Recipe 7: Sheet Pan Eggs with Vegetables
Ingredients You'll Need (Makes 6 servings)
- 12 large eggs
- 1/2 cup milk
- 1 teaspoon salt
- 1/2 teaspoon black pepper
- 2 cups chopped vegetables (bell peppers, cherry tomatoes, broccoli, spinach)
- 1 cup shredded cheese
- Cooking spray
Step-by-Step Instructions
- Preheat your oven to 375°F. Line a 9x13-inch rimmed baking sheet with parchment paper and spray with cooking spray. The parchment is crucial for easy cleanup.
- If using harder vegetables like broccoli or bell peppers, toss them with 1 tablespoon olive oil and roast for 10 minutes first. Softer vegetables like spinach or tomatoes can go in raw.
- Whisk eggs, milk, salt, and pepper together in a large bowl until well combined and slightly frothy.
- Spread vegetables evenly across the prepared baking sheet.
- Pour egg mixture over the vegetables, making sure it spreads evenly to all corners.
- Sprinkle cheese evenly over the top.
- Bake for 15-18 minutes until the eggs are set in the center and no longer jiggly. The edges will puff up and turn golden.
- Let cool for 10 minutes, then cut into 6 equal portions using a sharp knife or pizza cutter.
⏱ Time Required: 10 minutes prep, 18 minutes baking
Storage Instructions
Store portions in individual airtight containers in the refrigerator for up to 6 days. Reheat in the microwave for 45-60 seconds until heated through. These also freeze well for up to 2 months—wrap individual portions in plastic wrap, then place in a freezer bag.
Recipe 8: Chia Seed Pudding Cups
Ingredients You'll Need (Makes 4 servings)
- 1 1/2 cups milk of choice
- 6 tablespoons chia seeds
- 2 tablespoons maple syrup or honey
- 1 teaspoon vanilla extract
- Pinch of salt
- Toppings: fruit, nuts, coconut, granola (add when serving)
Step-by-Step Instructions
- In a mixing bowl, whisk together milk, maple syrup, vanilla, and salt until combined.
- Add chia seeds and whisk thoroughly for 30 seconds. The seeds will want to clump together.
- Divide mixture evenly among 4 jars or containers (about 1/2 cup each).
- Refrigerate for at least 4 hours, or preferably overnight. After the first hour, stir each jar vigorously to break up any clumps that formed.
- Before serving, stir and add your desired toppings.
Recipe Variations
- Chocolate Chia Pudding: Add 2 tablespoons cocoa powder to the milk mixture
- Matcha Chia Pudding: Whisk in 1 teaspoon matcha powder
- Coconut Mango: Use coconut milk and top with diced mango and coconut flakes
⏱ Time Required: 5 minutes active prep, 4+ hours setting time
Storage Instructions
Chia pudding lasts 5-7 days in sealed containers in the refrigerator. The texture continues to thicken over time. If it gets too thick, stir in a splash of milk before eating. Don't add fresh fruit until the morning you plan to eat it.
Recipe 9: Freezer-Friendly Pancakes
Ingredients You'll Need (Makes 16 pancakes)
- 2 cups all-purpose flour
- 2 tablespoons sugar
- 2 teaspoons baking powder
- 1 teaspoon baking soda
- 1/2 teaspoon salt
- 2 cups buttermilk (or make your own: 2 cups milk + 2 tablespoons lemon juice, let sit 5 minutes)
- 2 large eggs
- 1/4 cup melted butter
- 1 teaspoon vanilla extract
Step-by-Step Instructions
- In a large bowl, whisk together flour, sugar, baking powder, baking soda, and salt.
- In a separate bowl, whisk together buttermilk, eggs, melted butter, and vanilla until well combined.
- Pour wet ingredients into dry ingredients and stir gently until just combined. Some lumps are fine—overmixing creates tough pancakes. Let batter rest for 5 minutes while your griddle heats.
- Heat a non-stick griddle or large skillet over medium heat (about 350°F if using an electric griddle). Lightly grease with butter or cooking spray.
- Pour 1/4 cup batter per pancake onto the hot griddle. Cook until bubbles form on the surface and edges look set, about 2-3 minutes.
- Flip and cook until golden brown on the second side, about 1-2 minutes more. The pancake should be cooked through when you press the center gently.
- Transfer cooked pancakes to a wire rack to cool completely. Don't stack them while hot or they'll steam and get soggy.
⏱ Time Required: 10 minutes prep, 20 minutes cooking
Storage Instructions
Once completely cool, stack pancakes with parchment paper between each one. Place stacks in freezer bags, pressing out excess air. Freeze for up to 3 months.
Reheat directly from frozen: Microwave for 30-45 seconds, or toast in a toaster or toaster oven for 2-3 minutes until heated through and slightly crispy on the edges.
Recipe 10: Energy Bite Snack Boxes
Ingredients You'll Need (Makes 24 bites)
- 1 cup old-fashioned oats
- 1/2 cup ground flaxseed
- 1/2 cup mini chocolate chips
- 1/2 cup creamy peanut butter or almond butter
- 1/3 cup honey
- 1 teaspoon vanilla extract
- Pinch of salt
Step-by-Step Instructions
- Mix all ingredients together in a large bowl until well combined. The mixture should be sticky and hold together when pressed. If it's too dry, add 1 tablespoon more honey or nut butter.
- Cover the bowl and refrigerate for 30 minutes. This makes the mixture much easier to roll.
- Store in airtight containers in the refrigerator.
Recipe Variations
- Cranberry Almond: Replace chocolate chips with dried cranberries and sliced almonds
- Coconut Date: Add 1/4 cup shredded coconut and replace chocolate chips with chopped dates
- Protein Boost: Add 2 tablespoons protein powder and reduce oats to 3/4 cup
⏱ Time Required: 10 minutes active prep, 30 minutes chilling
Storage Instructions
Practical Meal Prep Tips
After a decade of breakfast meal prep, these are the game-changing tips that make the biggest difference:
Invest in quality storage containers. I wasted money on cheap containers that cracked, stained, and leaked for years before finally buying glass containers with secure lids. The initial cost is higher, but they've lasted me 5+ years and keep food fresher longer. For breakfast meal prep ideas, Use 2-cup glass containers for most recipes.
Common Mistakes to Avoid
Skipping the cooling step. Putting hot food directly into containers and sealing them creates condensation, which makes everything soggy and reduces shelf life. I cool everything to room temperature first, even if it means waiting 30 minutes. For more tips on proper food storage and safety, check out meal prep guidelines from Serious Eats.
Frequently Asked Questions
How long do breakfast meal prep recipes actually last in the fridge?
Can I freeze breakfast meal prep?
Absolutely. Many easy breakfast meal prep recipes freeze beautifully for 2-3 months. Breakfast burritos, egg muffin cups, pancakes, waffles, and baked goods like muffins all freeze excellently. I wrap individual portions in plastic wrap, then place them in freezer bags with the date labeled. Overnight oats, Greek yogurt parfaits, and fresh fruit-based items don't freeze well because the texture changes dramatically. Always cool items completely before freezing to prevent ice crystals.
What's the best way to reheat meal prep breakfasts?
Microwave reheating works best for most breakfast meal prep ideas. For egg muffins and burritos, I microwave for 45-60 seconds, then let them stand for 30 seconds before eating—the center stays very hot. Pancakes and muffins can be microwaved for 20-30 seconds or toasted for better texture. Overnight oats and chia pudding are eaten cold or at room temperature. Sheet pan eggs reheat well covered in the microwave for 60-90 seconds. Never reheat anything still in storage containers unless they're microwave-safe.
Do I need special containers for breakfast meal prep?
Not necessarily, but quality containers make a huge difference. Use 2-cup glass containers with locking lids for most recipes, 16-ounce mason jars for overnight oats and parfaits, and aluminum foil for freezing burritos. Glass containers don't stain, don't retain odors, and are microwave-safe. Avoid cheap plastic containers that crack easily and leak. You don't need to spend a fortune—I built my collection gradually over several months. Having 10-12 matching containers makes meal prep much more organized.
How do Keep breakfast meal prep from getting boring?
Are these breakfast meal prep ideas actually healthy?
These recipes focus on whole food ingredients, adequate protein, and balanced nutrition. Egg-based options provide 12-15g protein per serving, overnight oats and quinoa bowls offer complex carbohydrates and fiber, and Greek yogurt parfaits deliver protein and probiotics. I've designed these recipes to keep you satisfied for 3-4 hours. That said, "healthy" means different things to different people—someone focused on low-carb eating will choose egg muffins, while someone needing quick energy might prefer overnight oats. Choose recipes that align with your nutritional needs and goals.
Conclusion
Breakfast meal prep has transformed my mornings from chaotic and stressful to calm and nourishing. These 10 practical breakfast meal prep ideas give you practical options that actually work in real life—not picture-perfect recipes that fall apart when you try to execute them on a busy Sunday.
The key to successful easy breakfast meal prep is choosing recipes you'll actually eat, investing in proper storage containers, and scheduling a consistent prep time each week. You don't need to be a experienced cook or spend hours in the kitchen—just two hours on Sunday provides nutritious breakfasts for the entire week.
Related Recommended Articles
Quick Ground Beef Recipes
Discover 15 quick ground beef recipes ready in 30 minutes or less. Perfect for busy weeknights!
Read More →
What to Make with Rotisserie Chicken
Transform rotisserie chicken into 15 quick, delicious meals in under 30 minutes.
Read More →